Real Assistants in an Online World

9 Things Your Virtual Assistant Wants You to Know

My team & I love our work as Virtual Assistants and Online Business Managers and truly love all our clients. Once in a while, I hear stories of less than ideal VA/Client relationships. If you’re working with a VA or are looking to work with one in the future, here are a few tips that will help keep your relationship in calm waters:

  1. We’re business owners too and will set our own policies and hours. Even though we sometimes choose to work on your project in the evening or on the weekend, that doesn’t mean you should expect it every time. We have families and personal lives too (just like you!).
  2. Mind readers are only in science fiction. Seriously. As much as we’d love to anticipate your every move, sometimes we need you to be direct and tell us what’s on your mind or what you need from us.
  3. Paying a rock bottom price per hour does not necessarily mean you’re getting a better deal. Will it take that person longer to do the same task? Are they proactive in looking out for your business and offering suggestions for improvement? Will they drop you the minute they get a full-time job offer?
  4. We tend to be perfectionists and strive to meet that goal in all our work, but once in a while we fall just a bit short. Be gentle when pointing those items out and be assured that we won’t repeat the same mistake twice.
  5. We hate asking why our payment is late. We love working with you and worry that non-payment is a sign of your unhappiness with our work. 99% of the time it’s simply a cash flow issue – communicate that and we’ll work with you to find an agreeable resolution!
  6. We love to hear your praise once in a while!
  7. Micromanaging is not helpful. We understand that this is your baby and you’re having a hard time letting go. Let’s work together to develop processes so you feel in the loop and we don’t feel our hands are tied.
  8. Your referrals will not mean you’ll lose our full attention or your work will suffer. You’ll always be a top priority on our schedule.
  9. Trust our areas of expertise. You hired us for specific skills and knowledge, don’t be afraid to trust our advice!

Free Call: Facebook Secrets for Small Business

Join me on Friday, March 2 at 11:00 am MDT (1:00 pm EDT)
Do you know the difference between a Facebook Profile and a Facebook Page?


Do you have networking contacts or even people you don’t know trying to “friend” you on Facebook?


Are you ready for free word of mouth marketing for your business?


Facebook Secrets for Small Business:

10 Secrets of Facebook + 1 Critical Mistake You Need to Avoid


Join me on this free Teleseminar and discover:

10 reasons your business needs to be on Facebook

 The businesses that benefit most from a Facebook presence

 1 critical mistake to avoid when setting up your Facebook presence

 The difference between a Profile, a Page and a Group

 Tips on balancing the personal and professional use of Social Media

 10 Secrets of Facebook success


What our past attendees have said:

“Wow! You have a real gift for making the unknown look comfortable and approachable!” (Walt)

“Cindy – your “Social Media” seminar has already exceeded my expectations and we aren’t even half way through! You rock!” (Debi)

“Cindy’s approach to teaching is stealing away my fears and anxieties. This class is opening my eyes to the potential of Social Networking.” (Dan)


Join me on Friday, March 2 at 11:00 am MDT (1:00 pm EDT)

The class is free, but you do need to register below!


Can’t make the live call? Don’t worry - everyone who registers will receive the class recording at no cost!


As a bonus, you’ll also receive a free copy of our “Essential Guide to Facebook”.

Register below to reserve your place right now!


(registration closed)

I look forward to helping you expand your business’ online reach!

Cindy Opong


Vote for me – Accelerate! Live scholarship

I’m so excited to be selected as one of the top 10 finalists in the Accelerate! Live scholarship contest! This is an industry conference that I’d really love to attend but will need some help getting there!

Check out all the finalists and you’ll find me at the bottom of the page (#10). There’s some quality competition (and good friends!) and I wish all the contestants good luck!

You can vote once per day so vote often. Thanks!

Accelerate! Live scholarship contestant

Adding Your Blog to Your Facebook Page

A client recently asked me how to add their blog’s RSS Feed to their Facebook Page. There are 2 main ways of doing this via applications – Notes or Networked Blogs. Instructions for both methods are below, complete with screen shots.

There are several advantages to using Networked Blog’s application over Notes including the ability to add multiple blogs, more reliable on automatic postings and pulling in pictures on your blog as the thumbnail. It may look more detailed here, but it’s not that hard – just follow the steps!

a

Adding a blog via the Networked Blog application:

  • Click on this link to go to the application page.
  • You may need to follow someone else’s blog before you can register your own (browse the topics & find one to follow).
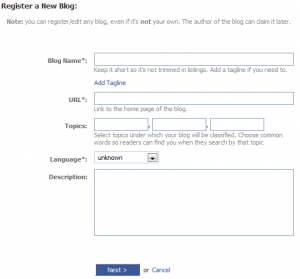
  • Click the button at the top “Register a Blog”.

    • Enter info about your blog (or the blog you want your friends/fans to see). The “Blog Name” is what your friends/fans will see prior to each post. It should be descriptive but not too long.
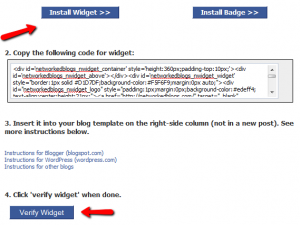
    • Click Next and then click yes to verify that you are the owner of the blog. The quickest way to verify this is to copy the code they will give you (click on “Use widget to verify ownership”) and place it in a sidebar widget of your blog. You can use any html widget to do this and can remove it from your blog once ownership is verified. Once the code is on your site, click the “Verify Widget” button on the Networked Blogs page.
  • Once this process is complete and your blog is added, you will need to set up automatic importing of your posts.
    • In the upper right corner of the application, you’ll see a link for “Syndication”. Click this and then choose your blog in the drop down box.
    • Check the box “Personal Facebook Profile” if you want blog posts to be seen on your personal wall & news feed.
    • If you are the administrator of any pages, you will see these listed. Click “Configure” for any page(s) you want the feed to appear on. You may need to click the “Install” button to add the application to that page. Then check the box “Auto-Publish blog posts to Page Wall” and you’ll be good to go!

Adding a blog via the Notes Application

  • There are 3 ways to get to the application:
    • Look for it on your tabs in your profile
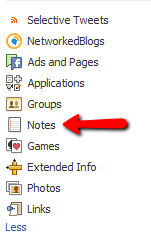
    • Look for it on the left sidebar in the applications area. You may need to click “See More” to see it listed.
    • In the search box, type “Notes” and it should come up – click on that link.
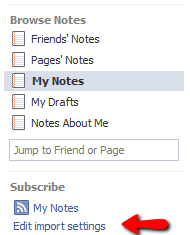
  • Once open, on the left sidebar, look for the text link that says “Edit Import Settings”
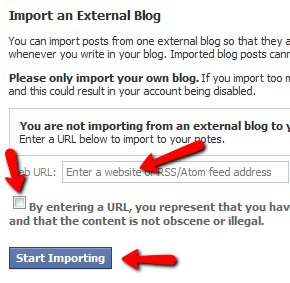
  • Enter your blog’s feed address in the box, check the agreement box and hit the “Start Importing” button. This may import *all* of your past blog posts, so just be aware. If you have a bunch then it could clog up the news feed on your Facebook wall.

New (and free!) webinar – Social Media 101

I’m excited to finally launch my new webinars on Social Media for small business!

The first in the series is a free webinar on Social Media 101. Join me on Thursday, Sept. 23 to learn what Social Media is (and isn’t), why you need it for your business, and how to get started. There’s a special bonus download for everyone who signs up (you get the recording too, so sign up even if you can’t attend live). Click here to see all the details and get registered!

The classes which will follow include detailed trainings on using the various Social Media sites (Facebook, Twitter, LinkeIn, etc.). These will be hands on training (hand holding if you like) designed to get you up and running without getting too overwhelmed. Look for announcements on these in the coming weeks!

I’m very excited to help get you on the right track in Social Media! I hope to see you on the call next Thursday!

Facebook for Business: Profile vs. Page vs. Group

Chances are, you have a Facebook account. It’s a great place to keep up with family and friends, or maybe a way to see the more personal side of clients or colleagues. As a business owner (especially if your customers are consumers), you may be realizing the value of having your company on Facebook too and building a following there. So you should probably create a separate Facebook account for your business, right?

Hold on! Before you create a second Facebook account or start using Facebook for business, there are a few very important things to know:

You can only have 1 Facebook Profile

Each individual may have 1 Facebook Profile (i.e. login). You cannot have a Facebook Profile for a business. Check out Facebook’s Terms of Service or FAQ on this subject if you want more information.

So what is a Facebook Profile? This is your main Facebook account, the one where you can accept people as “Friends”, post your vacation pictures, play games, and talk with your friends about… anything that you like. You can set your privacy settings so that only your Friends can view what you write on your wall, the comments you make to friends, the pictures you post, your personal contact information, etc. While many people do indeed post work related items on their profiles (I do frequently), your profile is really a place for you to be personal.

How do you use Facebook for business?

The way to get your business on Facebook is to create a Facebook Page. Although you have to create the page from your personal Profile, those who “Like” your Facebook Page won’t see anything from your personal Profile unless they’re already your Friends.

A Facebook Page is the place for you to talk about business. Anyone can connect with your page without seeing all your personal information and posts. Your connections can grow to unlimited numbers (the limit on your Profile is 5000 friends). Some things you can do on or with your Page:

  • Talk about what you do and the services you provide.
  • Give readers tips and tricks on your area of expertise.
  • Encourage contacts to sign up for your newsletter.
  • Run contests.
  • Conduct polls.
  • Start discussions and interact with those who Like your Page.
  • Create a custom landing tab where you educate new visitors about what you do or direct them to a special.
  • Update contacts quickly and easily (you can only message 20 people at a time via your personal Profile).
  • Create a Specials tab that only those who have “Liked” your Page can see.

A Page is like a website – anyone can visit and get information about your business. Your personal information and posts are protected unless you decide to Friend someone from the Page.

What about Facebook Groups?

Facebook Groups are designed more for groups of people with a common interest.  Things like a church group, participants in a class,  alumni of a college, etc. Groups can be private (only members see group activity) or public and you can choose to restrict/moderate membership. Groups can email up to 5000 members at a time but have limited functionality when it comes to customization and applications.

Here’s a great breakdown from Mari Smith on Pages vs. Groups.

Enhanced by Zemanta